Web coding lesson 2

By the end of this lesson, you’ll be able to mark up simple web pages using HTML 5. You’ll be able to recognize the HTML tags available for laying out a basic page and you’ll know how a style sheet is applied to a page.
1. Back to page structure
Let’s dive in and refresh our memory about page structure:
<!DOCTYPE html>
    <html lang="en">
        <head>
            <meta charset="UTF-8" />
            <title>Hello World!</title>
        </head>
       <body>
           <p>Hello World!</p>
       </body>
</html>
This is a strict and short structure of a page. Most browsers will render a page like this in the same way. However, it’s not too early to begin considering how HTML5 gets rendered by different browsers. So what we are going to do is create a simple page with one style rule and the HTML5 <time> tag.
2. Testing a page across browsers
Style sheets are a way to apply formatting rules to a page without messing up the code with lots of attribute values. At one time, you would have had to do something like this with HTML: <font face="verdana" color="black">. Now, you can apply a style rule instead: <p class="body">. That class will contain all the rules for text formatting.
Let’s try it out:
<!DOCTYPE html>
    <html lang="en">
      <head>
        <meta charset="UTF-8" />
        <title>Styling HTML5 Elments</title>
        <style>
         time
         {
             font-style: italic;
         }
       </style>
     </head>
<body>
    <p>This was created on <time datetime="2014-08-07">August 7th, 2014</time>.</p>
</body>
</html>
Task 1
Create this page in the Codeanywhere Sandbox and try it out using the browsing tool:
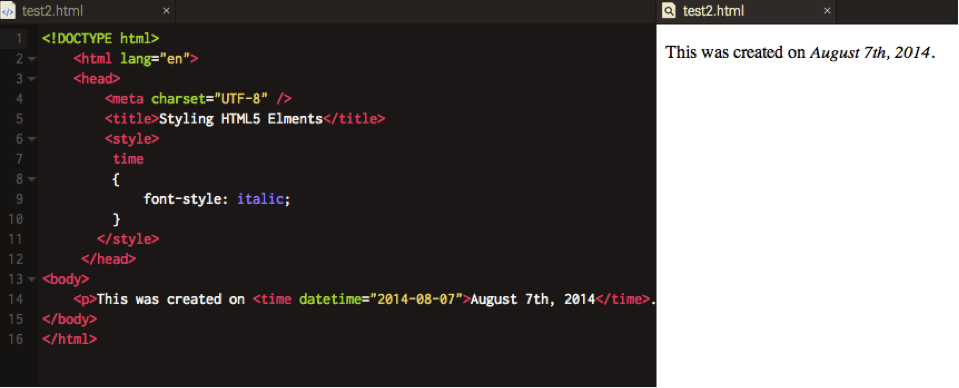
What you should see in browsers like Firefox, Chrome, Safari and recent versions of Internet Explorer is a line of text showing the date in italics. If you were to look at the page in a version of IE older than 9, the time element wouldn’t render at all. There is a way past this – we’ll come to it a bit later.
The style rule we see here is applied via what we call an embedded style sheet. In later lessons, you’ll see how we can create style sheets in a separate document. Notice how the <time> element is targeted directly in the style rule.
3. The shiv
Handling unsupported HTML5 elements in older version of IE can be dealt with by using something that is known as the shiv. It was created by Remy Sharp and can be included in your pages like this:
<!DOCTYPE html>
    <html lang="en">
    <head>
        <meta charset="UTF-8" />
        <title>Styling HTML5 Elements</title>
        <!--[if lt IE 9]>
            <script src="http://html5shiv.googlecode.com/svn/trunk/html5.js"></script>
        <![endif]-->
        <style>
         time
         {
             font-style: italic;
         }
       </style>
     </head>
<body>
    <p>This was created on <time datetime="2014-08-07">August 7th, 2014</time>.</p>
</body>
</html>
What this does is include a Javascript file that fixes the lack of support for HTML5 elements in older versions of IE. If you read the code carefully, you’ll probably notice that what it does is check the version of the browser rendering the page. If it happens to be older that IE 9, the Javascript file will be called. Otherwise, it will be ignored.
4. Presentation
Now we’ll begin to look at some of the markup options for presenting text. In previous versions of HTML, there were many tags for rendering text. HTML5 keeps things simple:
<em>Italitics</em>
<strong>bold</strong>
<hr> horizontal rule
<h1>Heading 1</h1>
<h2>Heading 2</h2>
<h3>Heading 3</h3>
The headings go all the way to
<h6></h6>
So now we can begin to format some text. Do the following back in Codeanywhere:
Task 2
- Create a new paragraph with the
<p></p>tags - Add some dummy text. You may have seen the same text called Lorem Ipsum which is Latin placeholder text. Codeanywhere supports the use of it; inside your
<p>tag type lorem then press the tab key. You’ll see that you get a small paragraph of Latin. It’s ideal for testing out HTML pages when you don’t want to type loads of content. - Now make a section of text bold and another section italicized.
- Add a horizontal rule and then another paragraph of Lorem Ipsum.
Your code should now look something like this:
<!DOCTYPE html>
    <html lang="en">
    <head>
        <meta charset="UTF-8" />
        <title>HTML Basic Presentation</title>
        <style>
         time
         {
             font-style: italic;
         }
       </style>
     </head>
<body>
    <p>This was created on <time datetime="2014-08-07">August 7th, 2014</time>.</p>

    <p>
        <em>Lorem ipsum dolor</em> sit amet, consectetur adipisicing elit. Architecto nesciunt soluta accusamus delectus iusto vitae
        molestias quod nostrum, praesentium deserunt. Perspiciatis officia ullam aspernatur possimus, <strong>officiis</strong>
        nemo natus inventore at.
    </p>
    <hr>
    <p>
        Lorem ipsum dolor sit amet, consectetur adipisicing elit. Tenetur provident eos soluta adipisci modi distinctio perferendis,
        amet et, molestiae cumque, aliquam sapiente at assumenda doloribus magni sequi vel autem, aut!
    </p>
</body>
</html>
3. Cascading Style Sheets
All right then. Since this isn’t 1999, we’d better look at how we can add some layout elements to our page. But to do that, first we need to look at how to create and use style sheets.
A style sheet is intended to define how the HTML elements should be displayed. Style rules can be applied in three ways:
- As a linked stylesheet docuemnt
- Embedded in a HTML document
- Inline - included in HTML tags
The best way is to use a separate document and that’s what we are going to do in this mini course. HTML was never intended to include formatting instructions. It was intended to mark up a document, to define its content.
CSS answers how we can format and style our pages.
Task 4
Let’s create a style sheet in Codeanywhere. You’ll notice in the Sandbox that you have a folder called css and, inside that, a file called: main.css:
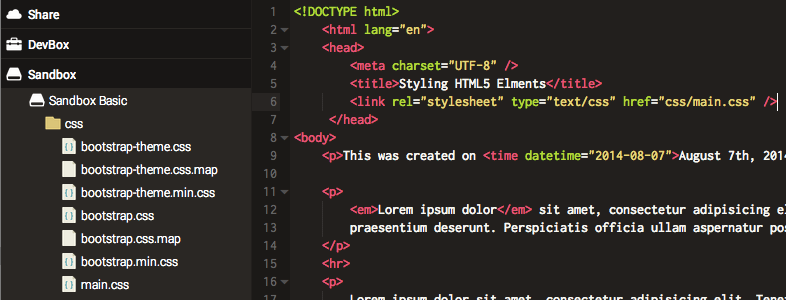
That’s useful, so we’ll utilize it. Instead of having an embedded style sheet in the <head> part of our page, we’ll link to the main.css file. Here’s how to do that:
<!DOCTYPE html>
    <html lang="en">
    <head>
        <meta charset="UTF-8" />
        <title>Styling HTML5 Elements</title>
        <link rel="stylesheet" type="text/css"href="css/main.css" />
    </head>
And now we’ll add some styles to our style sheet. First, copy the time style rule from the <head> of the document into the CSS file:
/* ==========================================================================
   Author's custom styles
   ========================================================================== */

time
{
    font-style: italic;
}
Then create a rule to style our paragraph text:
/* ==========================================================================
Author's custom styles
========================================================================== */
time{
font-style: italic;
}
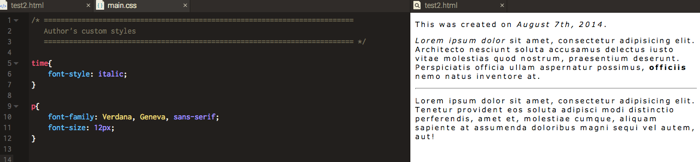
p{
font-family: Verdana, Geneva, sans-serif;
font-size: 12px;
}You can now refresh your preview of the HTML document in Codeanywhere and you’ll see how the style rules are applied:
Finally…
In this lesson, you have continued to build on your knowledge of HTML tags and you have seen how to create a style sheet and link it to your web page. You’ve also been introduced to some basic style rules.
In the next lesson, we’ll build an actual page using HTML5 structural elements and CSS to lay out the page elements.
We kindly thank Andy Hawthorne who originaly wrote this article.